Comprehensive Walkthrough: Building and Deploying a Java Application on an AWS EC2 Instance

Configurations :
Instance type — t3a.medium(2 vCPUs and 4 GiB memory)
Ubuntu AMI (22.04 LTS or 20.04 LTS version )
Tomcat9 web server for Spring Boot Applications
Build java application with maven and access on browser
Step 1 : Creating EC2 Instance
First of all, create an EC2 instance using the above configurations. After launching the instance, go to “Instances” and select the specific instance. In the instance dropdown, navigate to “Security” and select the associated security group. In the security group, select “Edit inbound rules” and add new rules with the following specifications:
Type: Custom TCP
Port Range: 8080 (For Tomcat)
Info: 0.0.0.0/0
Type: Custom TCP
Port Range: 3306(For MySQL)
Info: 0.0.0.0/0
Step 2 : Connection in Command line Interface
After completing the necessary specifications, click on “Save Rules” in the bottom right corner. Now connect to the EC2 instance using the SSH client option and do the following :
Locate your private key file (key pair file).
Open Git Bash from the location where the key pair file is located. You can do this by navigating to the directory in the file explorer, then typing cmd in the location bar and pressing Enter.
Ensure your key is not publicly viewable by running the following command:
chmod 600 "key-pair-file"
Now, connect to your instance using the following command:
ssh -i "key-pair-file" ubuntu@ec2-Public-IP.ap-south-1.compute.amazonaws.com
Now, you are in your instance.
Step 3 : Installing Java
In the instance firstly we need to upgrade and update the packages
sudo apt update
sudo apt upgrade
Next, you need to install Java on the instance. To facilitate this, we can employ Tomcat (an open-source web server and servlet container commonly used to deploy Java-based web applications)
Install Tomcat 9:
sudo apt install tomcat9 -y
To check whether Java and Tomcat are installed, use the following commands :
java -version
tomcat9 -version
Note:
The tomcat command might not directly show the version. Instead, you may need to check the Tomcat directory or use specific commands depending on how Tomcat is installed on your system.
To check the status of Tomcat:
systemctl status tomcat9.service
If Tomcat is not active, start it with:
systemctl start tomcat9.service
After starting, check the status again:
systemctl status tomcat9.service
This will indicate whether Tomcat is running successfully.
Step 4 : Build java application
Now, you need to deploy Java application on the server. To accomplish this, you can clone the GitHub repository. To clone your GitHub repository for the Java application, use the following command:
git clone https://github.com/ahmedJamaal/Tire-shop.git
Replace https://github.com/ahmedJamaal/Tire-shop.git with the actual link to your GitHub repository. This command will download the contents of the repository to your current working directory.
To check the contents of the directory after cloning, navigate to the Tire-shop directory. In the next step, build the Java application (Tire-shop) using Maven.
Check Maven version:
mvn --version
If Maven is not installed, install it:
sudo apt install maven
Check Maven version again:
Now, to build the Java application, use the following commands:
mvn clean
mvn install
These commands will clean the project, then compile, test, and package the application.
Step 5 : Deploy java application on server
Copy the build file (.war) to the web server (Tomcat).
Navigate to the Tomcat webapps directory:
cd /var/lib/tomcat9/webapps
Copy the Tire-shop.war file to the webapps directory:
cp ~/Tire-shop/target/Tire-shop.war .
Here . represents the current directory, which is the Tomcat webapps directory. The cp command is used to copy the file from the source (specified before the space) to the destination (specified after the space).
To access your application in web browser, open the browser and enter the public IP address of your instance along with port 8080 and the context path for your application. If the application is named “Tire-shop,” you can access it using the following URL:
http://<your_instance_public_IP>:8080/Tire-shop
Replace <your_instance_public_IP> with the actual public IP address of your EC2 instance. This should allow you to access your Java application deployed on Tomcat.
Step 6 : Connect with MySQL
The next step is to connect the frontend (Java application built with Maven) with the backend (MySQL database). To achieve this, move back to the parent directory (Tire-shop) and perform the following steps
Update the system
sudo apt update -y
Install MySQL
sudo apt install mysql-server -y
Start MySQL by running the following command
sudo systemctl start mysql.service
Check the Status of MySQL (Active or Inactive)
sudo systemctl status mysql.service
In the next step, log in to the MySQL user with the already created username
sudo mysql -u username -p
After logging in , Grant permissions for the database to connect to the user
GRANT ALL PRIVILEGES ON tiresshop.* TO 'yourusername'@'localhost' IDENTIFIED BY 'yourpassword';
FLUSH PRIVILEGES;
EXIT;
Step 7: Applying the new configurations and running on the browser
● Now, you can navigate to the MySQL properties file to modify configurations. The path for the file is src/main/resources/persistence-mysql.properties
Make the necessary changes in the URL, username, and password and save the modifications.
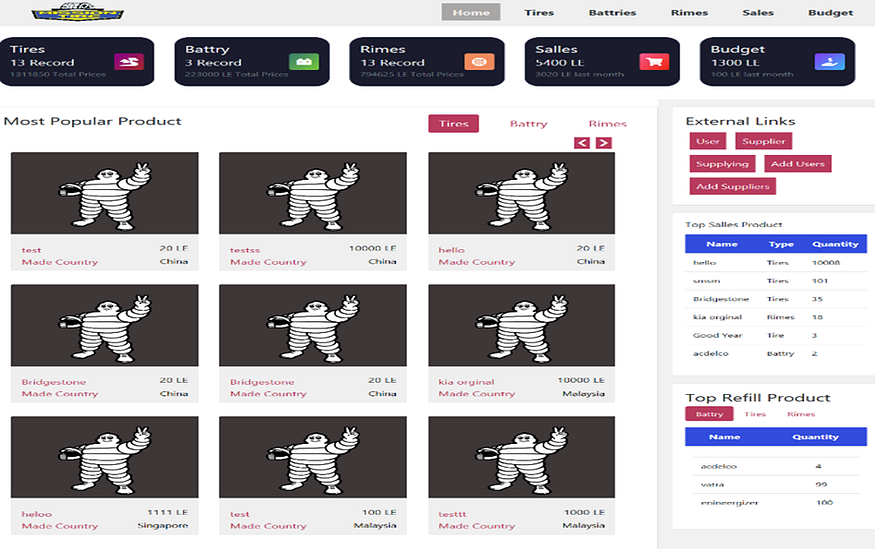
● After making the changes, restart the MySQL service to ensure that these modifications persist. Following that, we will rebuild the Java application using Maven. This will ensure that our frontend and backend are fully connected. Below are screenshots of the Login Page and Home Page.

Login Page

Home Page
Conclusion:
Deploying Java application on an EC2 instance opens up a world of possibilities for scaling and accessibility. With the flexibility of AWS, you can easily configure your instance, install necessary components like Java and Tomcat, and seamlessly integrate with services like MySQL. This approach not only ensures your application runs smoothly but also provides a solid foundation for future growth and development. Embracing AWS for hosting empowers you to focus on building great software while leveraging the power of the cloud for a reliable and scalable infrastructure.
Thank you for taking the time to read my blog. Your feedback is immensely valuable to me. Please feel free to share your thoughts and suggestions.
