
Unleashing Code Quality: Mastering the Installation and Configuration of SonarQube on AWS EC2 - Your Ultimate Step-by-Step Guide


Transform your software development process with SonarQube on AWS EC2, an unparalleled combination of advanced code analysis and cloud scalability. By leveraging this powerful duo, you can elevate your code quality, enhance performance, and ensure your applications reach new heights of excellence. Whether you're a seasoned developer or just starting, SonarQube on AWS EC2 is your gateway to unlocking the full potential of your projects, making every line of code count
Introduction
SonarQube is a powerful tool for ensuring code quality, providing developers with detailed insights into code issues and vulnerabilities. By installing and configuring SonarQube on AWS EC2, you can leverage the scalability and flexibility of the cloud to enhance your software development process. This guide will walk you through the step-by-step process of setting up SonarQube on an AWS EC2 instance, empowering you to deliver high-quality code with confidence.
Specifications
Ubuntu 22.04 / 20.04 LTS
CPU : 2 vCPU
Volume : 20 GB
RAM : 4 GB
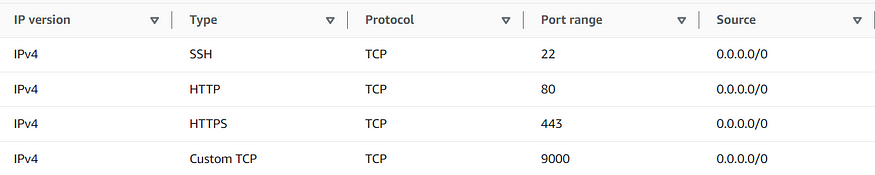
Security Ports (shown below)
NOTE : The specifications provided are the minimum; however, feel free to increase them according to your needs.
Step 1 : Ubuntu EC2 Instance: Command-Line Gateway Unlocked
a) Connect to an AWS EC2 Ubuntu server using SSH
chmod 600 "key-pair-file"
ssh -i "key-pair-file" ubuntu@ec2-Public-IP.ap-south-1.compute.amazonaws.com
Now, you are in your instance.
b) In the instance firstly we need to upgrade and update the packages
sudo apt update
sudo apt upgrade -y

update

upgrade
Step 2 : Effortless Installation: Java and PostgreSQL Made Simple!
a) To unlock the full potential of the latest SonarQube version, ensure you have OpenJDK 17 installed.
sudo apt install -y openjdk-17-jdk

java installation
b) It’s crucial to verify the installed Java version.
java -version

java version check
c) To install and configure PostgreSQL, start by adding the PostgreSQL repository.
sudo sh -c 'echo "deb http://apt.postgresql.org/pub/repos/apt/ `lsb_release -cs`-pgdg main" /etc/apt/sources.list.d/pgdg.list'

PostgreSQL repo
d) To proceed with installing and configuring PostgreSQL, add the PostgreSQL signing key.
wget -q https://www.postgresql.org/media/keys/ACCC4CF8.asc -O - | sudo apt-key add -

PostgreSQL signing key
e) To complete the PostgreSQL setup, proceed by installing PostgreSQL.
sudo apt install postgresql postgresql-contrib -y

PostgreSQL installation
f) Ensure the database server starts automatically upon reboot for seamless operation.
sudo systemctl enable postgresql

Enable PostgreSQL
g) Initiate the database server to begin operations.
sudo systemctl start postgresql
h) Verify the current status of the database server.
sudo systemctl status postgresql

Active state of PostgreSQL
i) It’s crucial to validate the installed version of the Postgres database.
psql --version

PostgreSQL version
j) Switch to the Postgres user account for further configuration.
sudo -i -u postgres

PostgreSQL User Account
Step 3 : Database Mastery: Crafting Configurations with Elegance!
a) Create a new database user to manage the sqube database.
createuser new_user
In my case, the command to set the password for the “sonar” user would be:
createuser sona
b) Log in to the PostgreSQL database to proceed with database operations.
psql

Login PostgreSQL
c) Set a strong password for the “sona” user. Use a password that meets security requirements in place of my_password.
ALTER USER [Created_user_name] WITH ENCRYPTED password 'my_password';
In my case command would be :
ALTER USER sona WITH ENCRYPTED password 'Sona#123';
d) Create a sqube database and assign the ownership to the “sona” user.
CREATE DATABASE [database_name] OWNER [Created_user_name];
In my case command would be :
CREATE DATABASE sqube OWNER sona;
e) Grant all privileges on the “sqube” database to the “sona” user.
GRANT ALL PRIVILEGES ON DATABASE sqube to sona;

Creating user and database
f) To verify the creation of the database, use the following command:
\l
g) To verify the creation of the database user, use the following command:
\du

List of databases and their role
h) To exit the PostgreSQL command-line interface, use the following command:
\q
i) To return to your non-root sudo user account, use the following command:
exit

return to sudo user
Step 4 : Empower Your Development: Downloading and Installing SonarQube
a) Install the zip utility, required for extracting the SonarQube files, using the following command:
sudo apt install zip -y
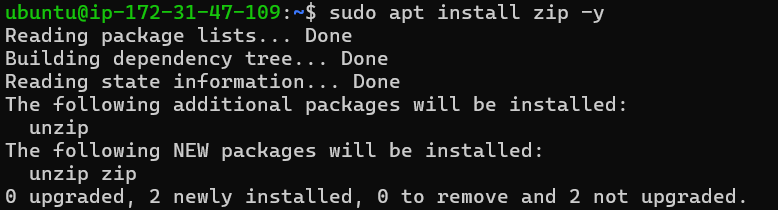
Install zip
b) First, obtain the latest download URL from the SonarQube official download page.
Then, download the SonarQube distribution files. For example, you can use the following link to download the latest version:
[Download SonarQube](https://www.sonarsource.com/products/sonarqube/downloads/)
Here, we are installing the latest version of SonarQube 10.4 Community Edition (free version).
sudo wget https://binaries.sonarsource.com/Distribution/sonarqube/sonarqube-10.4.1.88267.zip

Installing binaries
c) Unzip the downloaded file using the following command:
sudo unzip sonarqube-10.4.1.88267.zip
d) Move the unzipped files to the /opt/sonarqube directory using the following command:
sudo mv sonarqube-10.4.1.88267 sonarqube
sudo mv sonarqube /opt/
Step 5 : Setting Up SonarQube: Adding Group and User
a) Create a dedicated user and group for SonarQube, ensuring it cannot run as the root user. For example, you can use the following commands to create a user and group named “sona”:
sudo groupadd sona
sudo useradd -d /opt/sonarqube -g sona sona

Adding group and user
b) Grant the “sona” user access to the /opt/sonarqube directory using the following command:
sudo chown -R sona:sona /opt/sonarqube

Granting user access
Step 6 : Fine-Tuning SonarQube: Configuring for Peak Performance
a) Edit the SonarQube configuration file located at /opt/sonarqube/conf/sonar.properties.
sudo nano /opt/sonarqube/conf/sonar.properties
b) Uncomment the following lines in the SonarQube configuration file (/opt/sonarqube/conf/sonar.properties) and add the database user and password you created:
sonar.jdbc.username=sona
sonar.jdbc.password=Sona#123
c) Below these lines, add the following line to specify the JDBC URL:
sonar.jdbc.url=jdbc:postgresql://localhost:5432/sqube
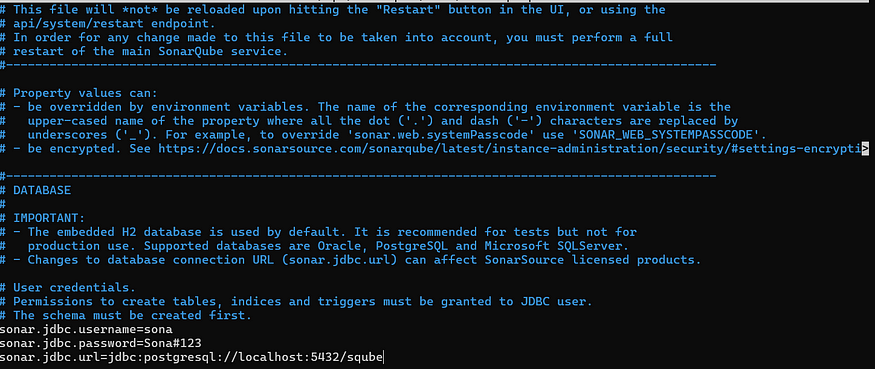
Adding to sonar.properties
d) Replace “sona” with your database username, “Sona#123” with your database password, and “sqube” with your database name.
e) Save and exit the sonar.properties file.
f) To edit the SonarQube script file, use the following command:
sudo nano /opt/sonarqube/bin/linux-x86-64/sonar.sh
g) Replace “linux-x86–64” with the appropriate directory for your installation if it’s different.
h) Add the following line to the SonarQube script file (/opt/sonarqube/bin/linux-x86–64/sonar.sh) to specify the user to run SonarQube as:
RUN_AS_USER=sona

Adding to sonar.sh
i) Replace “sona” with the name of the user you created earlier.
j) Save and exit the sonar.sh file.
Step 7 : Streamlining SonarQube: Setting Up a systemd Service
a) To create a systemd service file for SonarQube, use the following steps:
(i) Create a new service file using a text editor:
sudo nano /etc/systemd/system/sonar.service
(ii) Add the following content to the file:
[Unit]
Description=SonarQube service
After=syslog.target network.target
[Service]
Type=forking
ExecStart=/opt/sonarqube/bin/linux-x86-64/sonar.sh start
ExecStop=/opt/sonarqube/bin/linux-x86-64/sonar.sh stop
User=sona
Group=sona
Restart=always
LimitNOFILE=65536
LimitNPROC=4096
[Install]
WantedBy=multi-user.target

Adding to sonar.service
Make sure to replace “User=sona” and “Group=sona” with the appropriate values you have created for your SonarQube installation.
(iii)Save and close the file.
b) Reload the systemd sonar to apply the changes:
sudo systemctl enable sonar
c) Enable the SonarQube service to start at boot:
sudo systemctl start sonar
d) Now, you can start the SonarQube service using the following command:
sudo systemctl status sonar

Checking status of sonar service
e) Hooray, it’s up and running smoothly!
Step 8 : Enhancing Performance: Modifying Kernel System Limits
a) To ensure SonarQube functions correctly with Elasticsearch, you’ll need to make some adjustments to the system defaults.
b) To edit the sysctl configuration file, use the following command:
sudo nano /etc/sysctl.conf
c) This file controls various kernel parameters.
d) Add the following lines to the sysctl configuration file (/etc/sysctl.conf):
vm.max_map_count=262144
fs.file-max=65536
ulimit -n 65536
ulimit -u 4096

Adding to sysctl file
e) Save and exit the sysctl configuration file.
f) To apply the changes, reboot the system using the following command:
sudo reboot
Step 9 : Exploring SonarQube: Accessing the Web Interface
a) Access SonarQube in a web browser by entering your server’s IP address followed by port 9000.
For example, http://IP:9000.

Login SonarQube
b) The default username and password are both “admin”.
c) To change the password in SonarQube, follow these steps:
(i) Log in to SonarQube using the username “admin” and password “admin”.
(ii) Once logged in, SonarQube will prompt you to change your password. Enter the current password “admin” and then enter your new password twice as prompted.
(iii) Click on the “Change password” button to save your new password.
Your password has now been successfully changed.
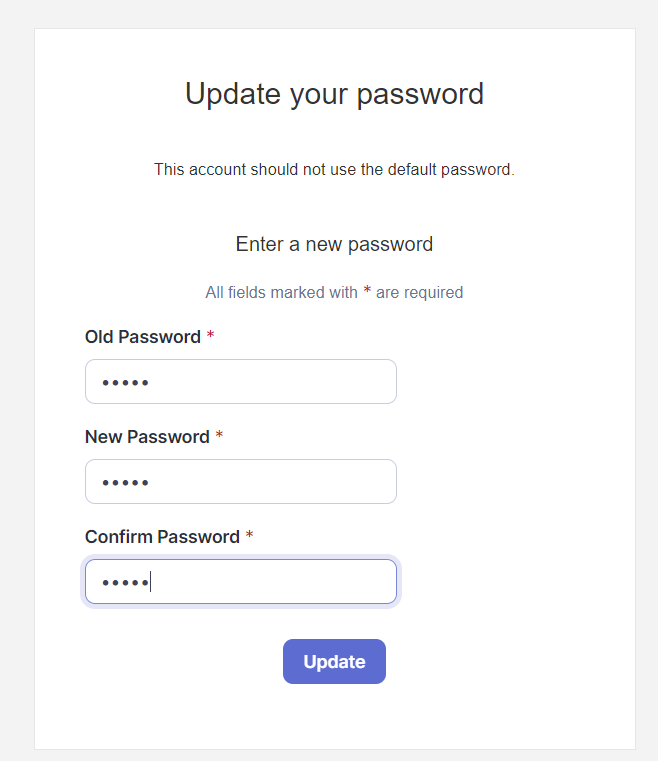
Updating Password
c) Congratulations on successfully installing SonarQube Community version 10.0 on AWS EC2 Ubuntu 22! If you have any more questions or need further assistance, feel free to ask. Happy coding!

SonarQube Portal
Conclusion :
We’ve now completed the successful installation of SonarQube Community version 10.4 on AWS EC2 Ubuntu 22/20. This accomplishment opens up new possibilities for enhancing code quality and optimizing development workflows. Should you encounter any challenges or require additional support, please don’t hesitate to reach out. Here’s to leveraging the power of SonarQube for improved software development practices!
Thank you for taking the time to read my blog. Your feedback is immensely valuable to me. Please feel free to share your thoughts and suggestions.